

Most videos do not lose viewers because the idea is bad; they lose them because the edit feels slow, noisy, or confusing. A few smart cuts, cleaner sound, and better pacing can instantly make your content easier to watch, whether you are posting tutorials, reviews, reels, or business videos online.
- Why Good Editing Matters More Than Fancy Effects
- Start With the Viewer’s Question
- Cut Pauses, Repetition, and Dead Air
- Fix Audio Before You Touch Color
- Use Captions and Text With a Purpose
- Choose Simple Cuts Over Distracting Transitions
- Make Color Look Natural First
- Export for the Platform You Actually Use
- Conclusion
- FAQs
Why Good Editing Matters More Than Fancy Effects
Most people do not stop watching a video because it lacks cinematic effects. They stop because it feels slow, unclear, noisy, or difficult to follow. Good editing removes that friction. It helps the viewer understand the point faster and stay engaged longer.
These Video Editing Tips are for creators, small business owners, YouTubers, educators, and beginners who want their videos to feel sharper without overcomplicating the process. You do not need expensive gear to improve. You need better decisions in the edit.
Start With the Viewer’s Question
Before cutting clips, ask one simple question: “What does the viewer want from this video?” A tutorial viewer wants clear steps. A product review viewer wants honest pros and cons. A vlog viewer wants a story, not random footage.
This mindset changes everything. Instead of arranging clips in the order you recorded them, arrange them in the order that helps the viewer. For example, a phone review should not begin with a long intro. Start with the main verdict, then explain camera quality, battery life, performance, and whether it is worth buying.
A strong edit is not just shorter. It is more purposeful.
Cut Pauses, Repetition, and Dead Air
One of the easiest ways to improve any video is to trim the parts where nothing useful happens. Long pauses, repeated phrases, awkward starts, and empty room tone make a video feel slower than it really is.
For talking-head videos, cut at natural sentence breaks. If the speaker says, “So, um, today we are going to talk about…” tighten it to the actual point. For YouTube videos, this can make the opening feel much stronger. For TikTok, Reels, and Shorts, it can be the difference between a scroll and a watch.
Do not cut so aggressively that the video feels robotic. Leave small breaths where emotion or meaning needs space. The goal is clean pacing, not panic pacing.
Also Read: Modern Video Editing Workflows for Creators and Marketers
Fix Audio Before You Touch Color
Beginners often spend too much time on color grading while ignoring bad sound. That is a mistake. Viewers can tolerate slightly average visuals, but they quickly leave when audio is harsh, echoey, or difficult to understand.
A practical workflow is simple: reduce background noise, balance voice volume, remove low hum, and keep music under control. In many editors, a high-pass filter around 80–100 Hz can reduce rumble from fans, traffic, or desk vibration. If a voice sounds sharp, gently reducing harsh frequencies around 2–5 kHz can help.
Tools like CapCut’s noise reduction, Adobe Podcast Enhance Speech, Premiere Pro’s Essential Sound panel, and DaVinci Resolve’s voice isolation can all improve rough audio. Use them carefully. Too much cleanup can make a voice sound watery or artificial.
A useful rule: if the viewer has to work hard to hear you, the edit has already failed.
Use Captions and Text With a Purpose
Captions are not just for accessibility. They help people follow videos in noisy places, silent scrolling situations, and fast tutorials. They also make names, tools, numbers, and steps easier to remember.
Keep captions readable. Use simple fonts, strong contrast, and enough screen time for people to read naturally. Do not fill the screen with every word if key phrase captions will work better.
For example, instead of showing a full paragraph during a cooking video, use short labels like “Low heat,” “Stir for 2 minutes,” or “Add sauce last.” For educational videos, label important ideas such as “Mistake #1” or “Export setting to check.”
Text should guide the viewer, not decorate the video.
Choose Simple Cuts Over Distracting Transitions
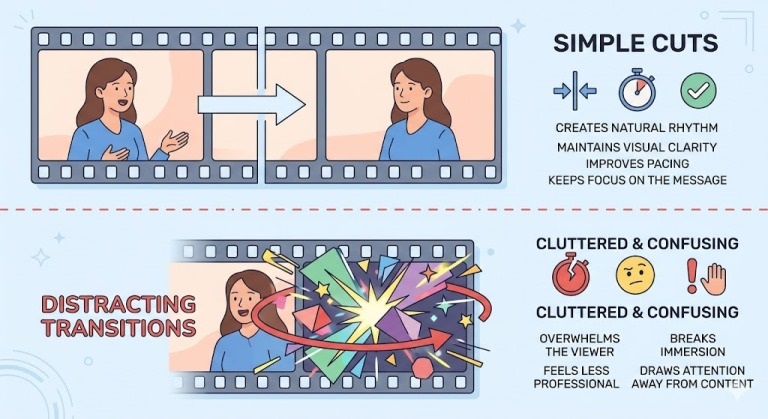
Transitions are useful when they help the story move. They become a problem when they call attention to themselves. Spinning effects, flashy zooms, and random wipes can make a video look amateur if they are used too often.
For most edits, a clean cut is enough. Use a fade when time passes. Use a subtle zoom when you want to emphasize a key point. Use a match cut when two clips share a similar movement or shape.
In real editing work, the best transition is often the one viewers do not notice. If they stay focused on the message, the transition did its job.
Make Color Look Natural First
Color correction should make footage look believable before it looks stylish. Start by fixing exposure, white balance, and skin tones. If the image is too dark, too yellow, or too blue, correct that before adding any creative look.
DaVinci Resolve is excellent for color work, but even basic tools in Premiere Pro, Final Cut Pro, CapCut, or mobile editing apps can handle simple corrections. Avoid heavy filters that make faces look strange or products look different from real life.
This matters most in product reviews, food videos, beauty content, real estate videos, and tutorials where accuracy builds trust.
Export for the Platform You Actually Use
A good edit can look poor if exported incorrectly. Before exporting, match the format to the platform. Use horizontal 16:9 for regular YouTube videos. Use vertical 9:16 for TikTok, Instagram Reels, and YouTube Shorts. Use 1080p as a safe standard, and 4K if your footage and platform need it.
Always watch the final export before uploading. Check the first ten seconds, caption size, music volume, and any awkward cuts. Many mistakes are easier to catch on a phone because that is where most people will watch.
Conclusion
Better editing is not about using more effects. It is about making the video easier to watch. Focus on clear structure, tight pacing, clean audio, useful captions, natural color, and correct export settings. Start by improving one old video with these steps, then apply the same checklist to your next project.
FAQs
What are the most important video editing tips for beginners?
Start with a clear message, cut slow parts, fix audio, add readable captions, use simple transitions, correct color naturally, and export in the right format.
Which video editing software is best for beginners?
CapCut is easy for short videos, DaVinci Resolve is powerful and free, and Premiere Pro is popular for professional workflows. The best choice depends on your content and comfort level.
How do I make my videos less boring?
Remove delays, open with the main value, change visuals when needed, and keep each section focused on one idea. Do not make viewers wait too long for the point.
Should I add music to every video?
No. Music should support the mood, not cover the message. If your video is educational or voice-heavy, keep music very low or skip it.
