
Buying a new solid-state drive should be simple—install it, migrate your files, and enjoy faster performance. The problem is that storage scams have gotten more convincing, and some drives can look legitimate in Windows while failing badly in real-world tests. In one recent case, a cloned high-end drive even showed the “right” model info in system tools, but delivered extremely low speeds until deeper verification exposed it.
Below is a practical, beginner-friendly tutorial you can follow before you trust the drive with important files.
- Step 1: Spot red flags before you even power it on
- Step 2: Do a safe “identity check” in your OS
- Step 3: Use a drive info tool to check what the SSD reports
- Step 4: Confirm real capacity with a write-and-verify test
- Step 5: Benchmark performance to catch “looks real, performs fake” drives
- Step 6: Verify with the manufacturer’s official software (when available)
- Step 7: Fast spot-check (especially for USB enclosures and portable drives)
- What to do if you detect a counterfeit SSD
- Quick checklist
Step 1: Spot red flags before you even power it on
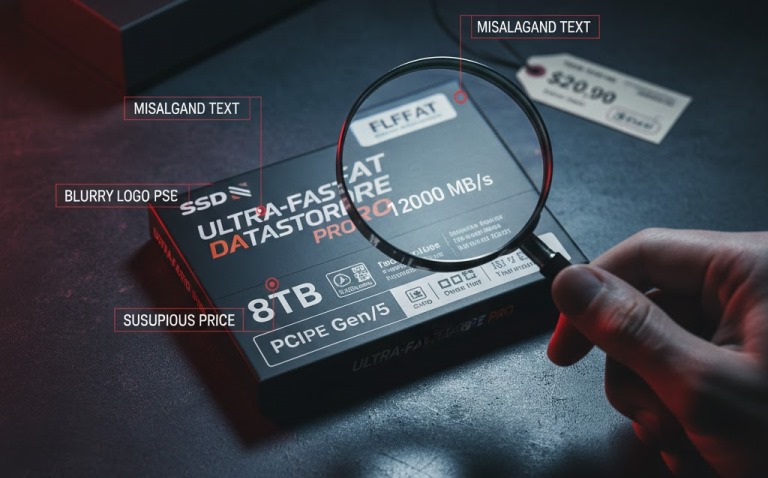
Counterfeiters often rely on two things: unrealistic pricing and vague listings.
- Price that makes no sense: If the deal is far below normal market pricing for that capacity and class, treat it as suspicious. Some sellers inflate capacity in firmware and sell “too good to be true” drives.
- Missing or vague specifications: Legit listings typically state interface (SATA vs PCIe), speeds, and model details. Scam listings hide behind generic “high speed” claims.
- Packaging/label quality: Poor print quality, misaligned text, or missing identifiers are common warning signs.
If anything looks off, do your testing before copying personal data.
Step 2: Do a safe “identity check” in your OS
This step won’t catch every fraud, but it can quickly reveal obvious mismatches.
- Open your operating system’s disk utility (Disk Management on Windows; Disk Utility on macOS).
- Confirm the interface and link speed match what you bought.
- Look for the drive serial number on the label and in software—if it’s missing, duplicated across multiple drives, or doesn’t match the brand’s typical format, pause and verify with the seller/manufacturer.
Also pay attention to firmware and bus details: advanced clones have been seen “passing” basic checks while still behaving wrong under performance testing.
Step 3: Use a drive info tool to check what the SSD reports
Now verify the SSD’s reported health and hardware metadata. A commonly used utility is CrystalDiskInfo, which can display firmware, health indicators, and other drive details.
What you’re looking for:
- Strange or blank firmware strings
- A mismatch between claimed specs and what the system negotiates (for example, a high-end model behaving like an older interface generation)
- Health info that looks suspicious on a “brand new” product (not always proof, but worth investigating)
This still isn’t a guarantee—some counterfeits spoof metadata convincingly—so capacity and speed tests matter.
Step 4: Confirm real capacity with a write-and-verify test
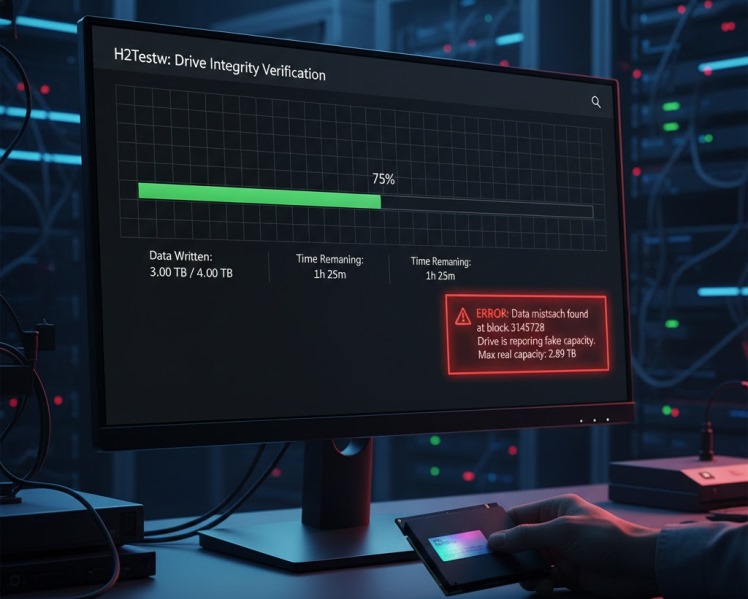
The most common scam is fake capacity: the drive reports 1TB/2TB/4TB, but only a small portion is real storage. Once you write past the true physical limit, files start corrupting.
A straightforward Windows tool for this is H2Testw, which writes test data across the drive and then verifies it. If the drive is lying about capacity, errors appear once it exceeds the real space.
Important safety rule:
- This test is destructive to whatever data is already on the drive. Run it on an empty SSD before storing anything valuable.
If you’re on Linux, an alternative approach is F3 (Fight Flash Fraud), which fills a device with pseudorandom data and checks whether it reads back correctly—useful for detecting manipulated capacity claims.
Also Read: How to Format a Hard Drive and SSD on Windows 11
Step 5: Benchmark performance to catch “looks real, performs fake” drives
Capacity scams aren’t the only issue. Some clones report believable specs but run at wildly incorrect speeds. In the recent cloned-drive case, performance tests showed extremely low read/write results even though the OS recognized the model.
To benchmark, you can use CrystalDiskMark, a widely used disk benchmark tool designed to measure storage read/write performance.
What to compare:
- Your results vs the manufacturer’s typical range (from official product pages or reputable reviews)
- Whether speeds match the interface (SATA vs PCIe)
If the drive is sold as a high-speed NVMe SSD but performs like a slow removable drive, that’s a serious authenticity red flag.
Step 6: Verify with the manufacturer’s official software (when available)
Some brands provide their own SSD management tools that can validate the device more reliably than generic utilities. In a real-world counterfeit case, the tool that finally flagged the clone was Samsung Magician.
If your drive brand offers an official utility, install it from the official site and run its drive status/authenticity checks right after installation.
Step 7: Fast spot-check (especially for USB enclosures and portable drives)
If you’re testing an SSD inside a USB enclosure—or any USB-connected flash storage—and you want a faster screening method before committing to a full write-and-verify test, ValiDrive is designed to spot-check storage and identify inflated capacity claims.
Use spot-checking as an early warning, then follow up with full verification if anything looks questionable.
What to do if you detect a counterfeit SSD
If your tests indicate a counterfeit SSD, don’t keep using it “carefully.” Capacity fraud can silently corrupt files once you hit the real limit.
- Stop writing new data to it.
- Save screenshots/logs of test results and the product listing.
- Request a refund immediately and report the fraudulent listing to the marketplace.
- If you already copied files onto it, re-copy from a known-good source and verify integrity.
Quick checklist
- Price/specs look realistic
- OS reports the expected interface/link behavior
- Info tool shows sane firmware/health data
- Capacity verified with a write/read validation test
- Benchmarks match what the drive class should deliver
- Official vendor utility agrees it’s authentic
If you want, tell me the brand/model you bought and whether it’s SATA or PCIe, and I’ll suggest the safest test sequence (least time + least risk) for your exact setup.