Accessing your Home Assistant files through a network share gives you a fast, reliable way to manage configuration and other folders from your PC or Mac—without juggling browser editors. In this guide, you’ll set up the Samba Share add-on, secure it properly, connect from Windows/macOS/Linux, and follow safe editing practices to avoid breaking your system.
Why access files over a network share?
A network share lets you manage Home Assistant folders from another computer on your LAN for faster editing and easy file transfers. This approach avoids editing in a browser tab. On supported installations, the Samba Share add-on exposes selected folders over SMB.
Prerequisites and important limits
Confirm your installation type
If you run Home Assistant OS, these steps work out of the box because add-ons are part of that installation type.
Add-ons are only available on certain installation types (notably the supervised/OS variants).
On an OS-based install, add-ons are managed by the Home Assistant Supervisor.
Know your LAN details
You’ll need your Home Assistant host name or IP address (Settings → System → Network).
Keep SMB access LAN-only.
Install Samba share
Step 1: Get the add-on
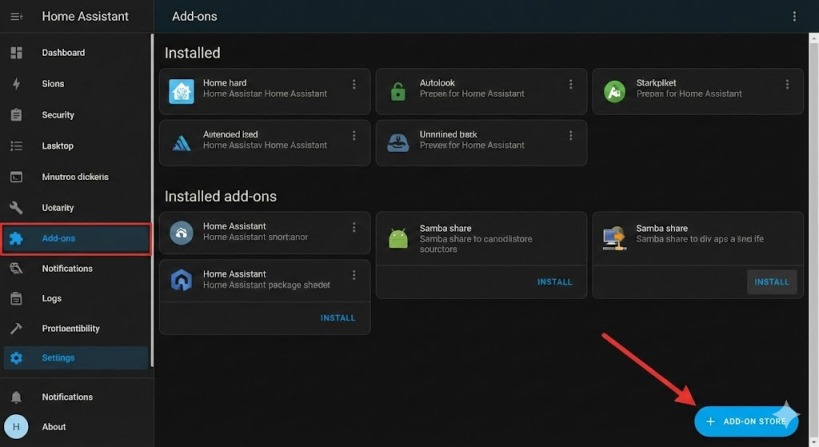
- Go to Settings → Add-ons.
- Open the Home Assistant Add-on Store, search for “Samba share”, and install it.
- Open the add-on and switch to the Configuration tab.
Configure the share securely
Step 2: Set credentials and choose shares
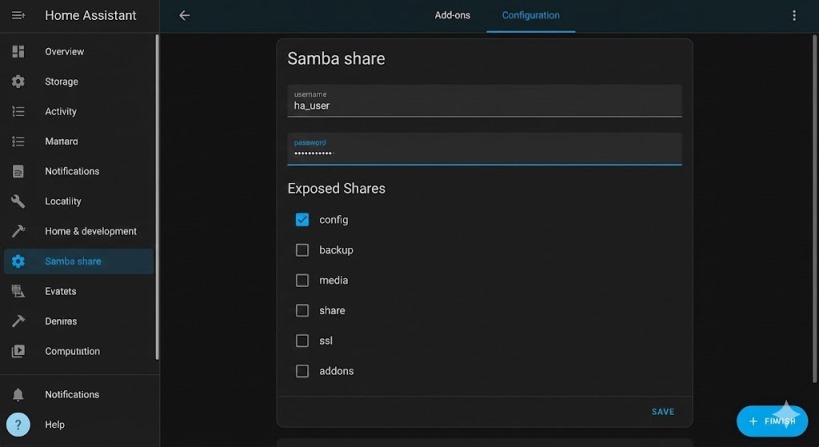
Set a username and password (these are separate from your Home Assistant login).
Then review the directories you’ll expose. The official documentation lists common shares such as config, backup, media, share, ssl, addons, and addon_configs.
A practical approach is to start with config only, then add backup or media when you have a clear reason.
Step 3: Restrict access
- Use allowed hosts to limit which IP ranges can connect (keep it to your private subnet(s)).
- Trim
enabled_sharesto only what you need; you can re-enable later. - Consider leaving
veto_filesenabled to reduce junk files created by client operating systems.
Security note: compatibility_mode enables older SMB protocols for legacy clients, but it lowers security—only enable it when you have a specific, confirmed requirement.
If your environment requires extra hardening, the add-on also documents server signing settings; keep defaults unless you understand the interoperability impact.
If Windows network browsing is flaky, set workgroup to match your PCs and consider enabling local_master.
Save, then start the add-on from its Info tab.
Also Read: How 6GHz Wi-Fi Solves Common Home Network Problems
Connect from Windows
Step 4: Browse and pin a folder
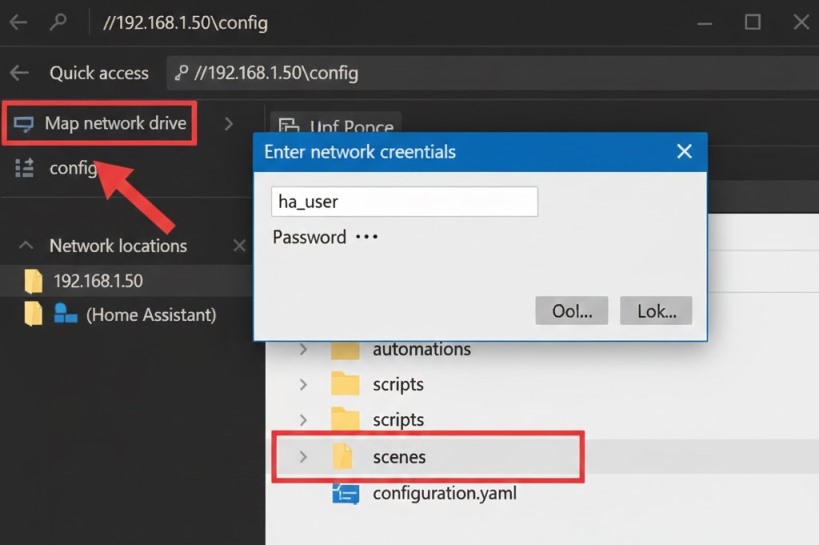
- Open Windows File Explorer.
- In the address bar, enter your share path using the IP (example:
\\192.168.1.50\) and sign in with your Samba credentials. - To keep it handy, map network drive to a specific folder (often
\\192.168.1.50\config) so it shows up under “This PC”.
Connect from macOS and Linux
Step 5: Use SMB URLs
- In MacOS Finder, choose Go → Connect to Server and enter smb://hostname (or an IP-based SMB URL).
- On many Linux desktops, use the file manager’s “Connect to Server” option and provide an SMB URL.
Edit safely and apply changes
Step 6: Make small, testable edits
Your main YAML configuration file is configuration.yaml, typically inside the config share.
After editing, use Home Assistant’s configuration validation (when available), then reload or restart so changes take effect.
Pragmatic safety tips:
- Avoid editing hidden system folders (for example
.storage) unless you know exactly what you’re changing. - Make a backup before big changes and before deleting files.
- Change one thing at a time, then reload/restart and verify.
Troubleshooting checklist
- Discovery doesn’t work: connect via IP instead of relying on “Network” browsing.
- Wrong credentials: Samba uses the add-on username/password, not your Home Assistant UI login.
- A share is missing: verify it’s present in
enabled_shares. - Some devices can’t connect: confirm they fall within your permitted IP ranges.
Conclusion
Accessing Home Assistant files via a network share is most effective when it’s done securely and deliberately. By using the Samba Share add-on, limiting exposed folders, and restricting allowed hosts, you gain convenient desktop access without unnecessary risk. Back up before major changes, edit carefully, and verify updates with validation and reloads.
FAQs
Q: Which folders should I share first?
Answer: Start with config only; add media or backup when you have a clear need.
Q: Is this available on Home Assistant Container?
Answer: Add-ons aren’t available there; you’d share the mounted config folder using your host OS instead.
Q: Why can I connect by IP but not by name?
Answer: Name discovery can vary by network and client; IP is the most reliable.
Q: Do I have to restart after every change?
Answer: Not always—many changes can be reloaded, but some require a restart, so test after each change.
Q: What’s the safest day-to-day workflow?
Answer: Back up, edit one change, validate, reload/restart, then confirm the system behaves as expected.